


How do I add and manage learners?
Add learners one at a time or in bulk with the Roster CSV, fix import errors, and archive accounts.
For: Super Admins, Admins, and Instructors
Learners are the people who use the sims in the headset. Two different controls add them, and knowing which one you need saves the most time: Roster creates new learner accounts, and Add Learner puts learners who already have accounts into a classroom.
If your district rosters through Clever, ClassLink, or NYC DOE, learner accounts arrive on their own — go to If your district rosters through Clever, ClassLink, or NYC DOE.
Add a learner from inside a classroom
Use this when the learner already has a Transfr account and needs access to this classroom — for example, they are moving from one instructor's classroom to another, or they need a second classroom alongside their current one.
- Open the classroom.
- Select the Learners tab.
- Select Add Learner.
- Start typing a learner's name in the field labelled "Add one or more existing learners...".
- Select the learner from the matches.
- Confirm.
Success looks like the learner appearing in the classroom's learner table, with the count on the Learners tab going up by one.
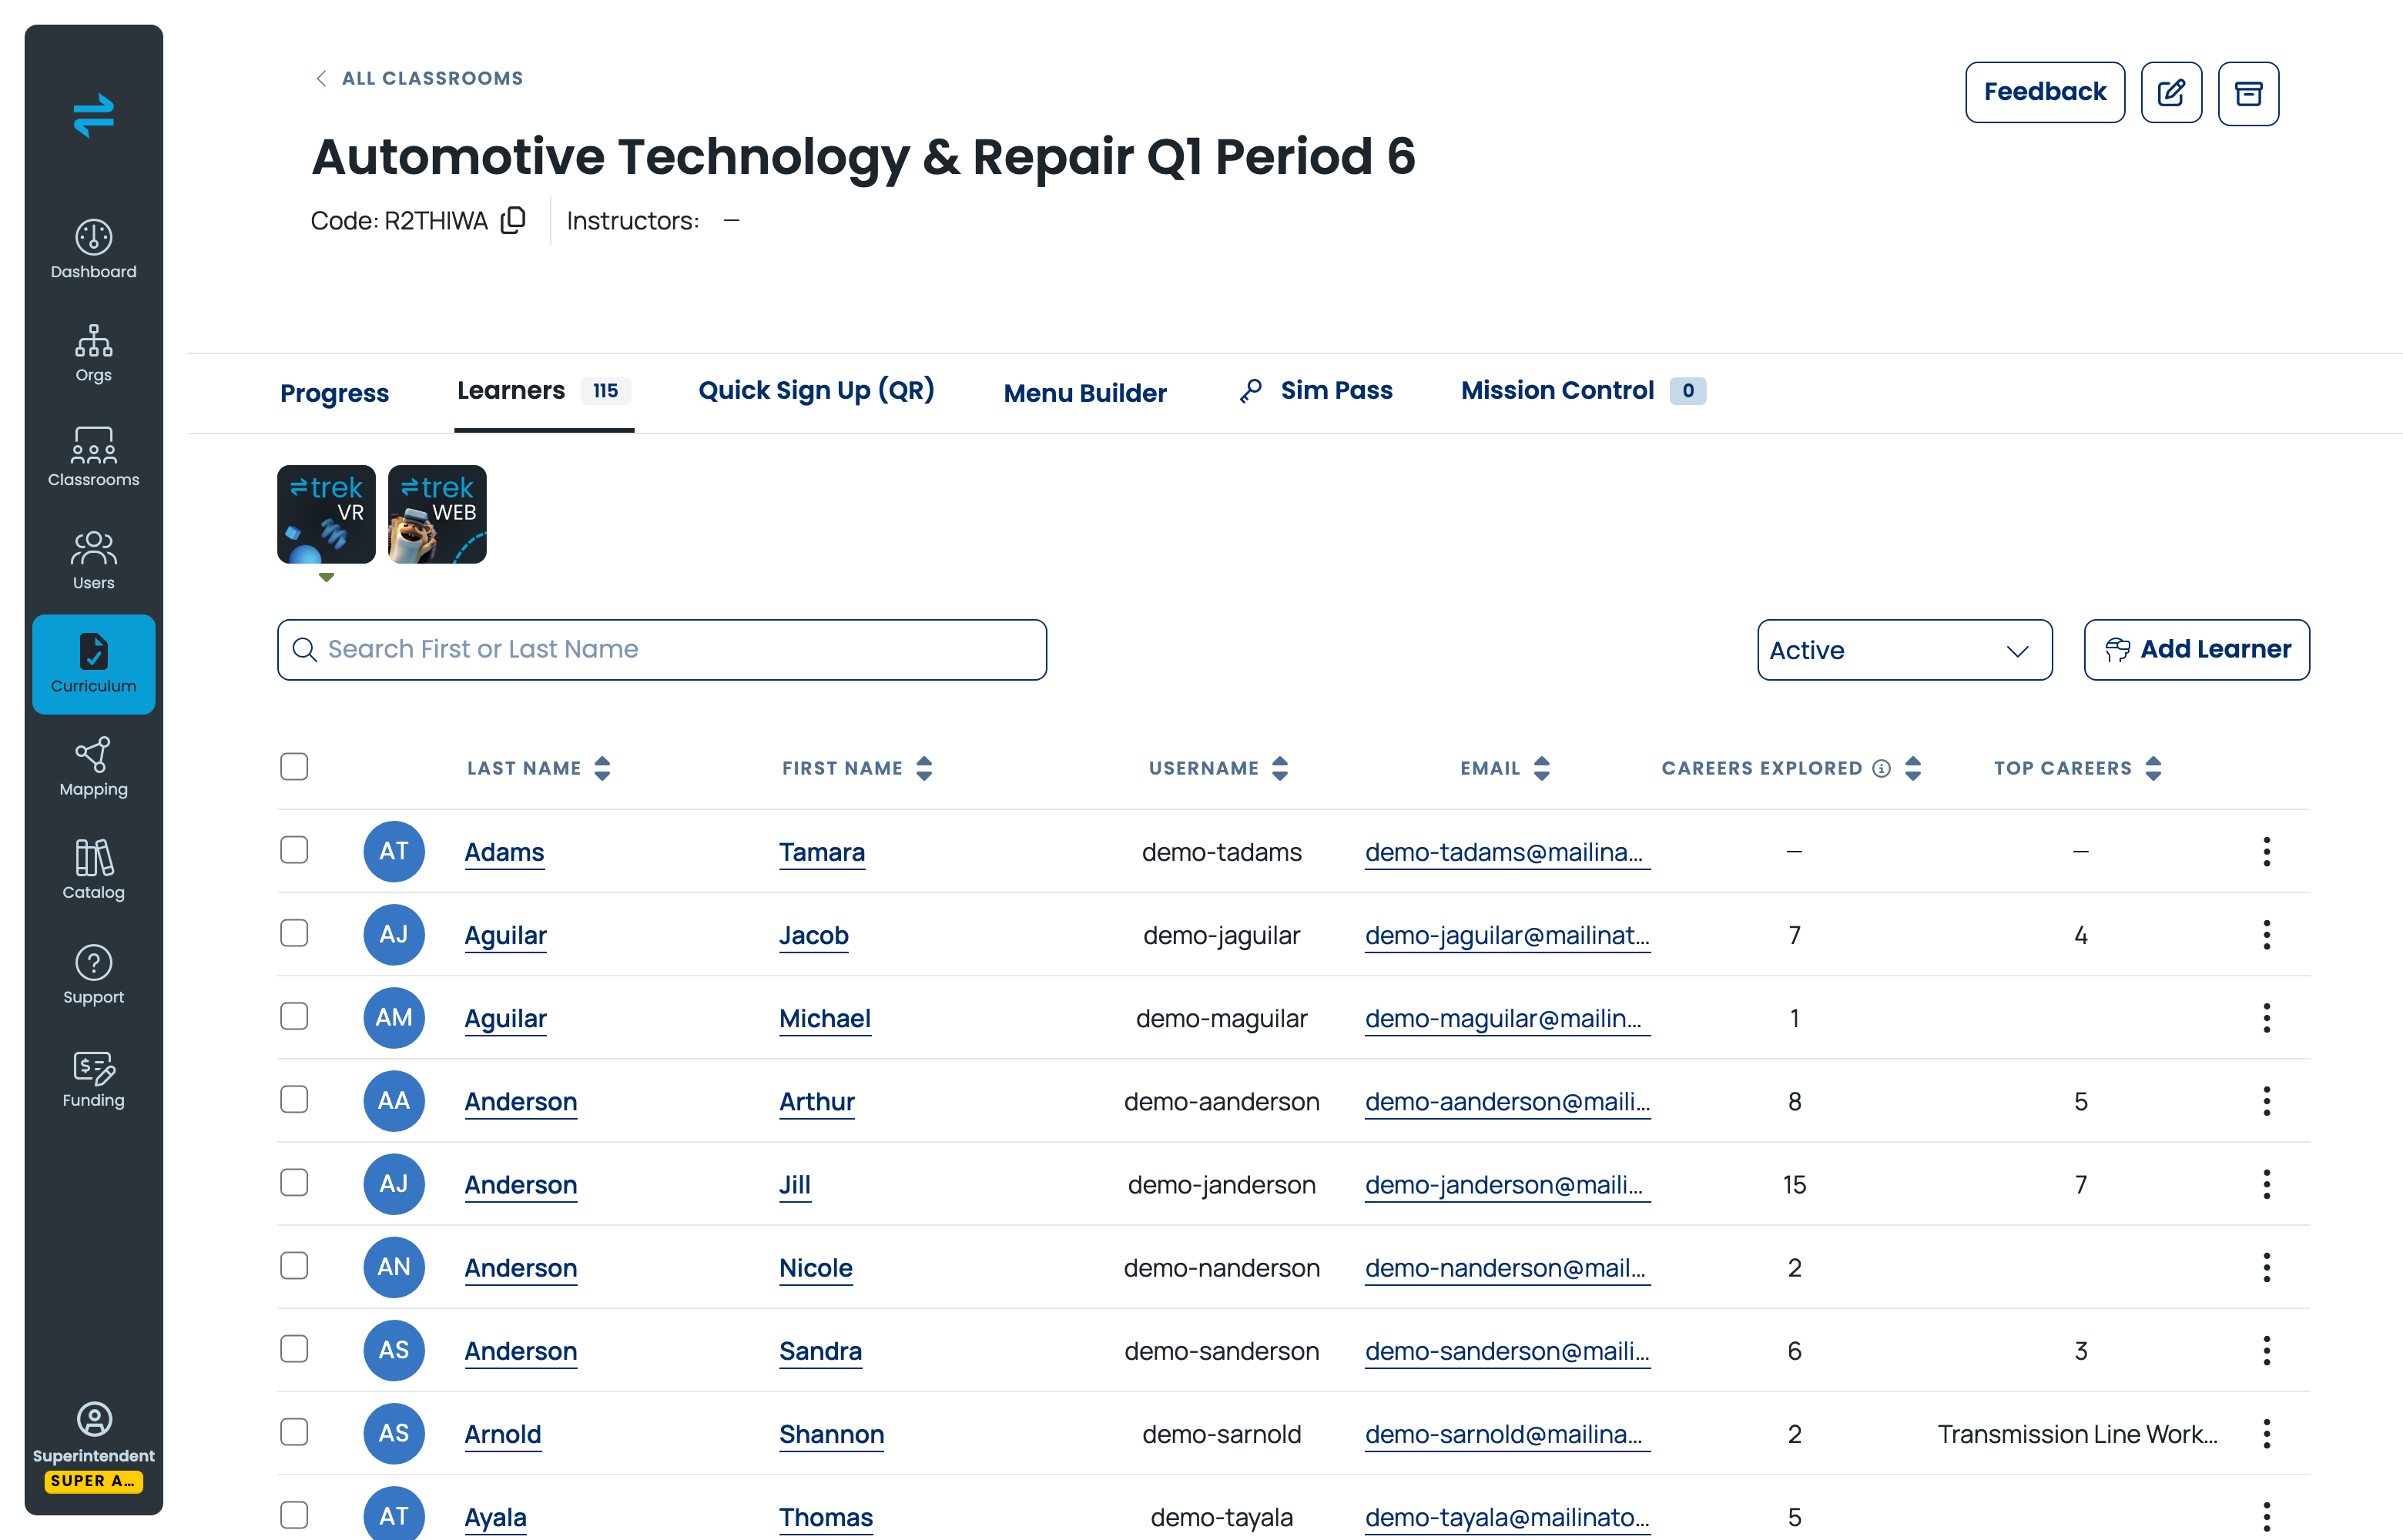
Add Learner does not create accounts. It only offers learners who already exist in your organization. If the learner you need is not in the list, create them first — see Import new learners with the CSV template.
A learner can belong to more than one classroom. Adding them here does not remove them from any classroom they are already in, and it does not change their username, password, or email.
Import new learners with the CSV template
New learner accounts are created in the Roster panel. Open it from Roster on your Dashboard home, or from Roster on the Users page with the Learners tab selected. Roster works for both new and existing people: as the panel itself puts it, "If a learner already exists their information will be updated."
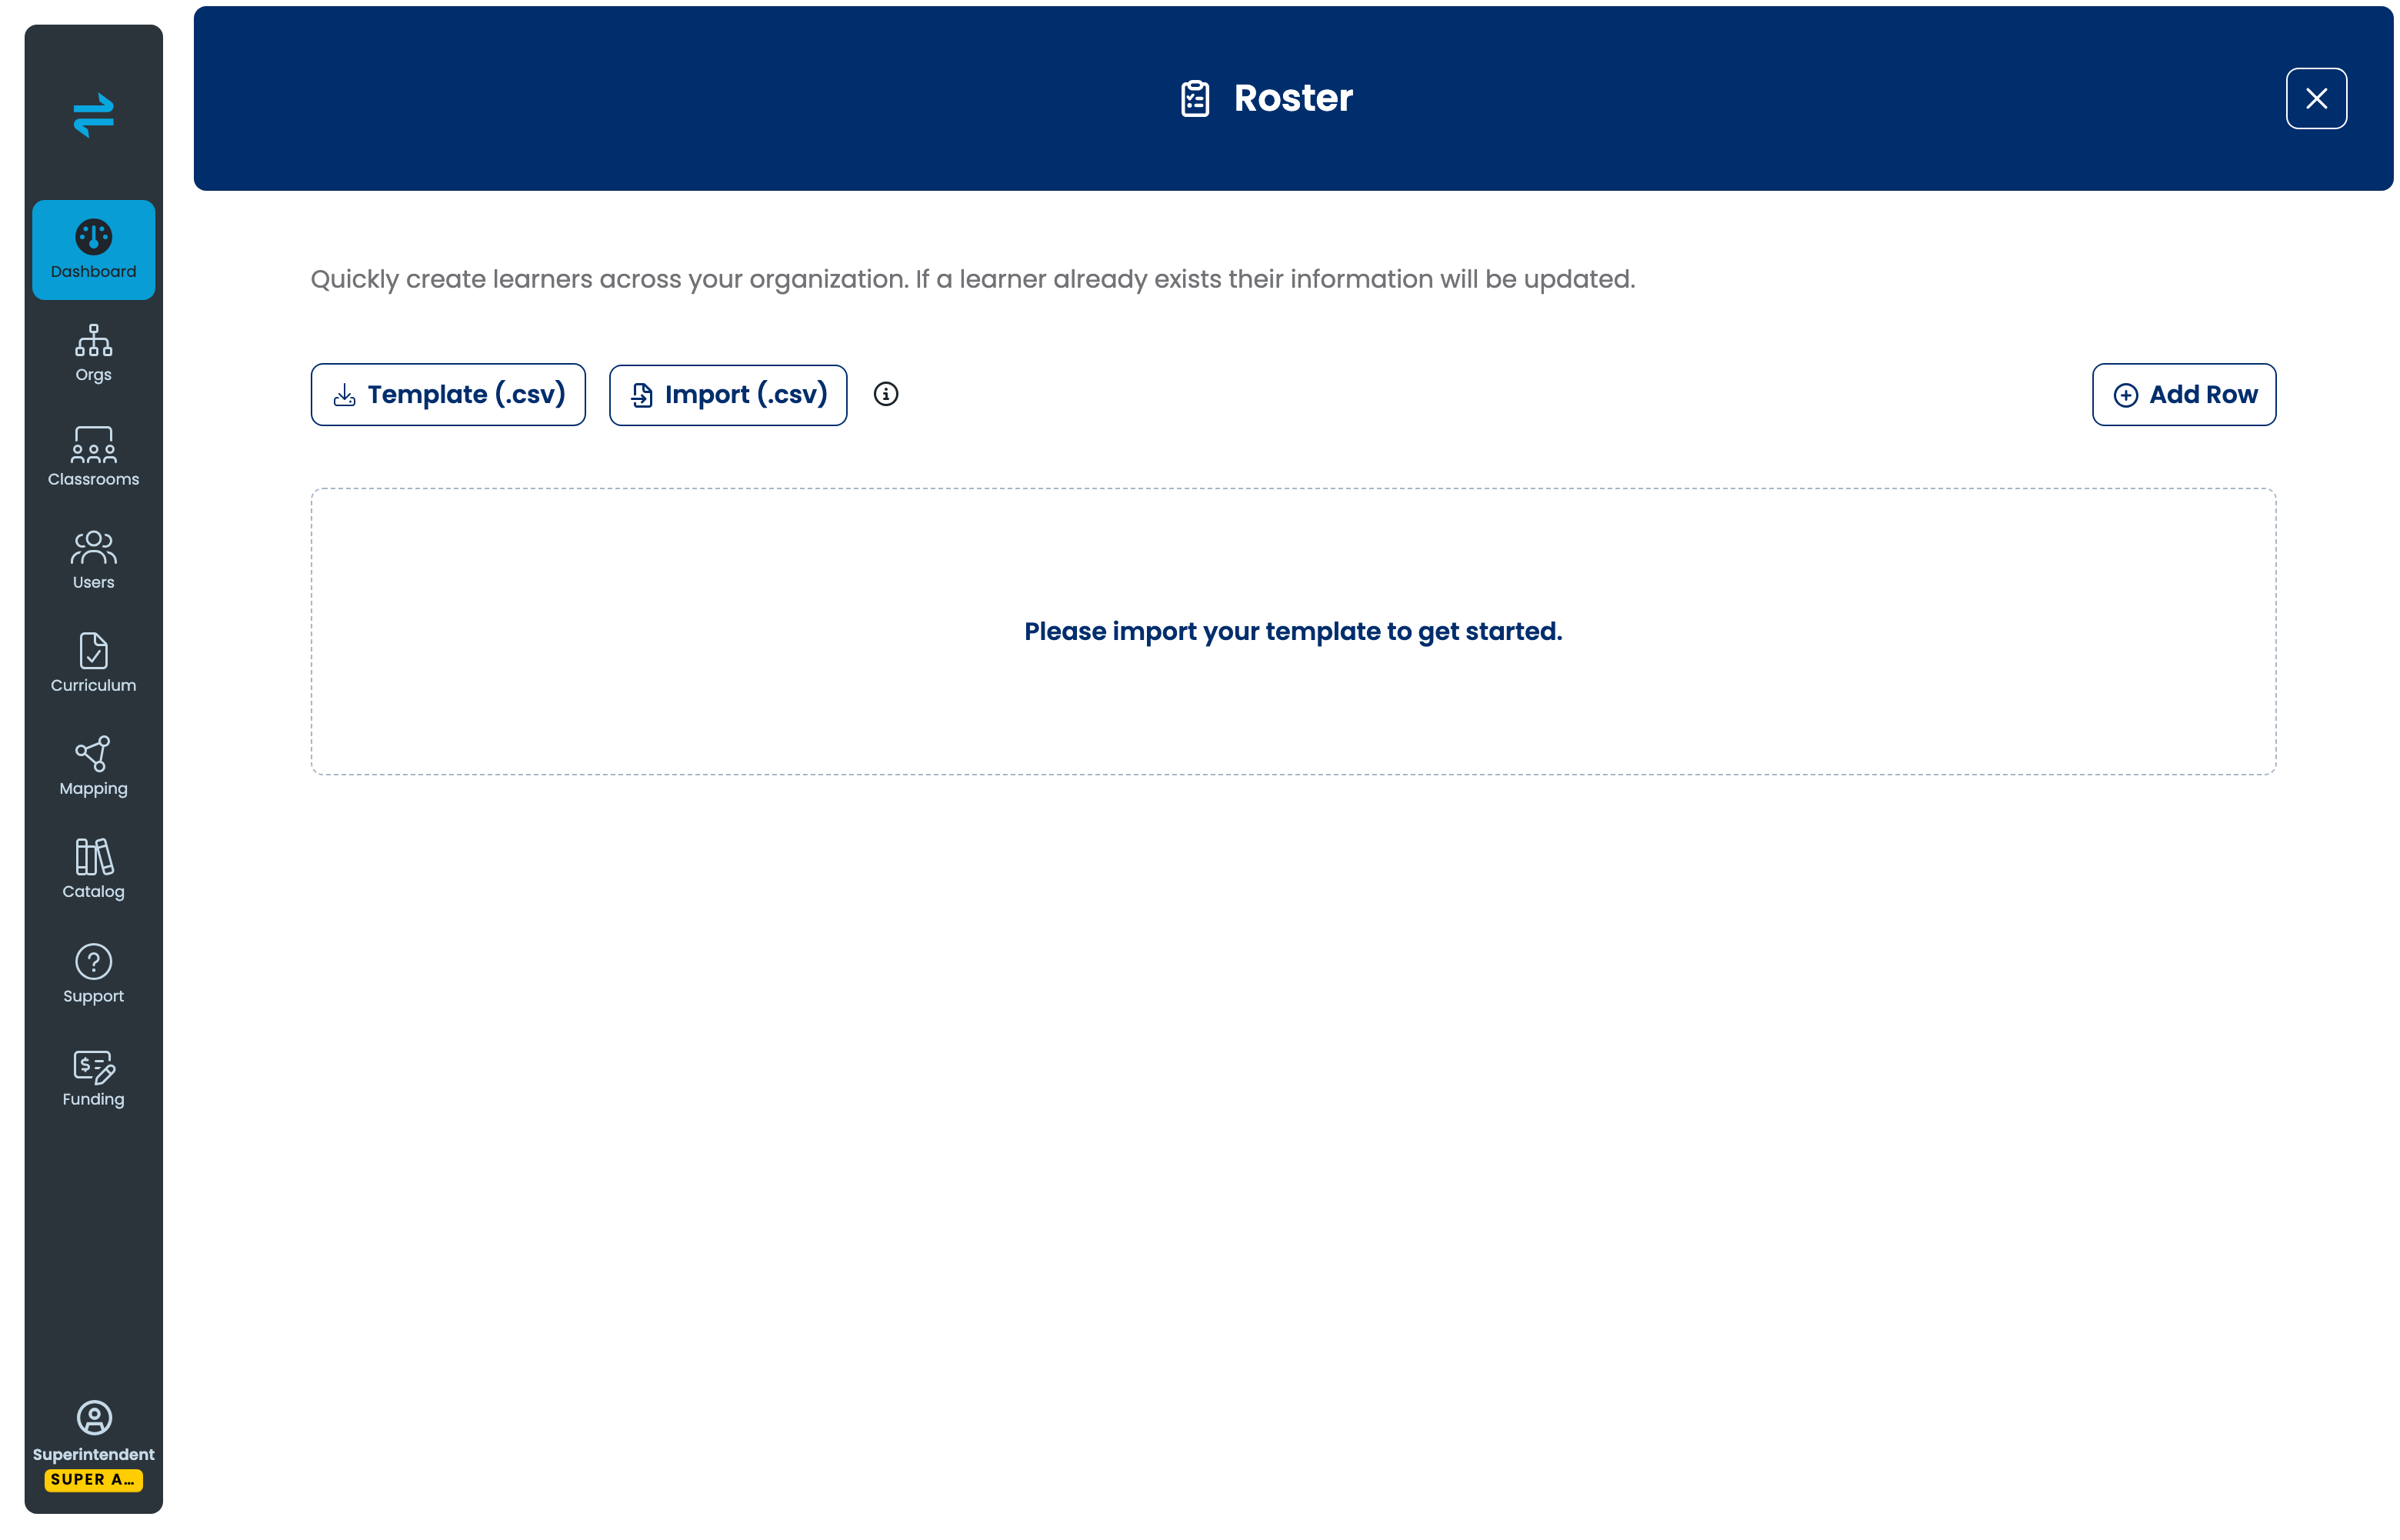
- Select Template (.csv).
- Open the downloaded file,
roster-user-upload-template.csv. - Add one learner per row underneath the column headings.
- Save the file in CSV format.
- Select Import (.csv) in Roster.
- Choose your file.
- Review the imported rows in the grid.
- Correct anything the grid flags.
- Select the publish button at the bottom of the panel.
The publish button carries the number of rows it is about to create, so check that figure matches what you expect. Success looks like the panel closing and those learners appearing under Users on the Learners tab.
To add a small number of learners without a file, select Add Row and fill the row in directly.
What the template columns are
The first three lines of the template begin with # and are instructions. The column headings are on the fourth line, and there are six of them, in this order:
First Name,Last Name,Classroom Code,Username,Email,PasswordEmail is the only optional column. Every other column is required for each learner.
The template's own instruction lines carry the two rules behind most rejected rows:
- Usernames must be unique and cannot already exist in the system.
- Passwords must be at least 4 characters, must contain at least one letter, and cannot contain whitespace or special characters other than
!@.-_?or a comma.
Note that a learner's password rules are not the same as the rules for staff accounts, so a password that works for an instructor may be rejected here.
Two things in the grid are not columns in your file. Status is added by the Dashboard to report problems with each row. Classroom Code becomes a dropdown once your file is imported — choose the classroom from that list rather than relying on a typed code, because the list shows each classroom's code next to its name and codes vary in length.
Re-importing is safe. If a learner already exists, the import updates their information instead of creating a duplicate, so you can correct a batch of typos or move several learners to a different classroom code by importing a corrected file.
Large files finish on their own. The Dashboard states: "Larger uploads will continue to process in the background. We will send you an email when the file is finished." You do not need to keep the panel open.
Fix errors in a CSV import
The message "File imported successfully." means the file itself was read. It does not mean every row can be created. Check the grid before you publish.
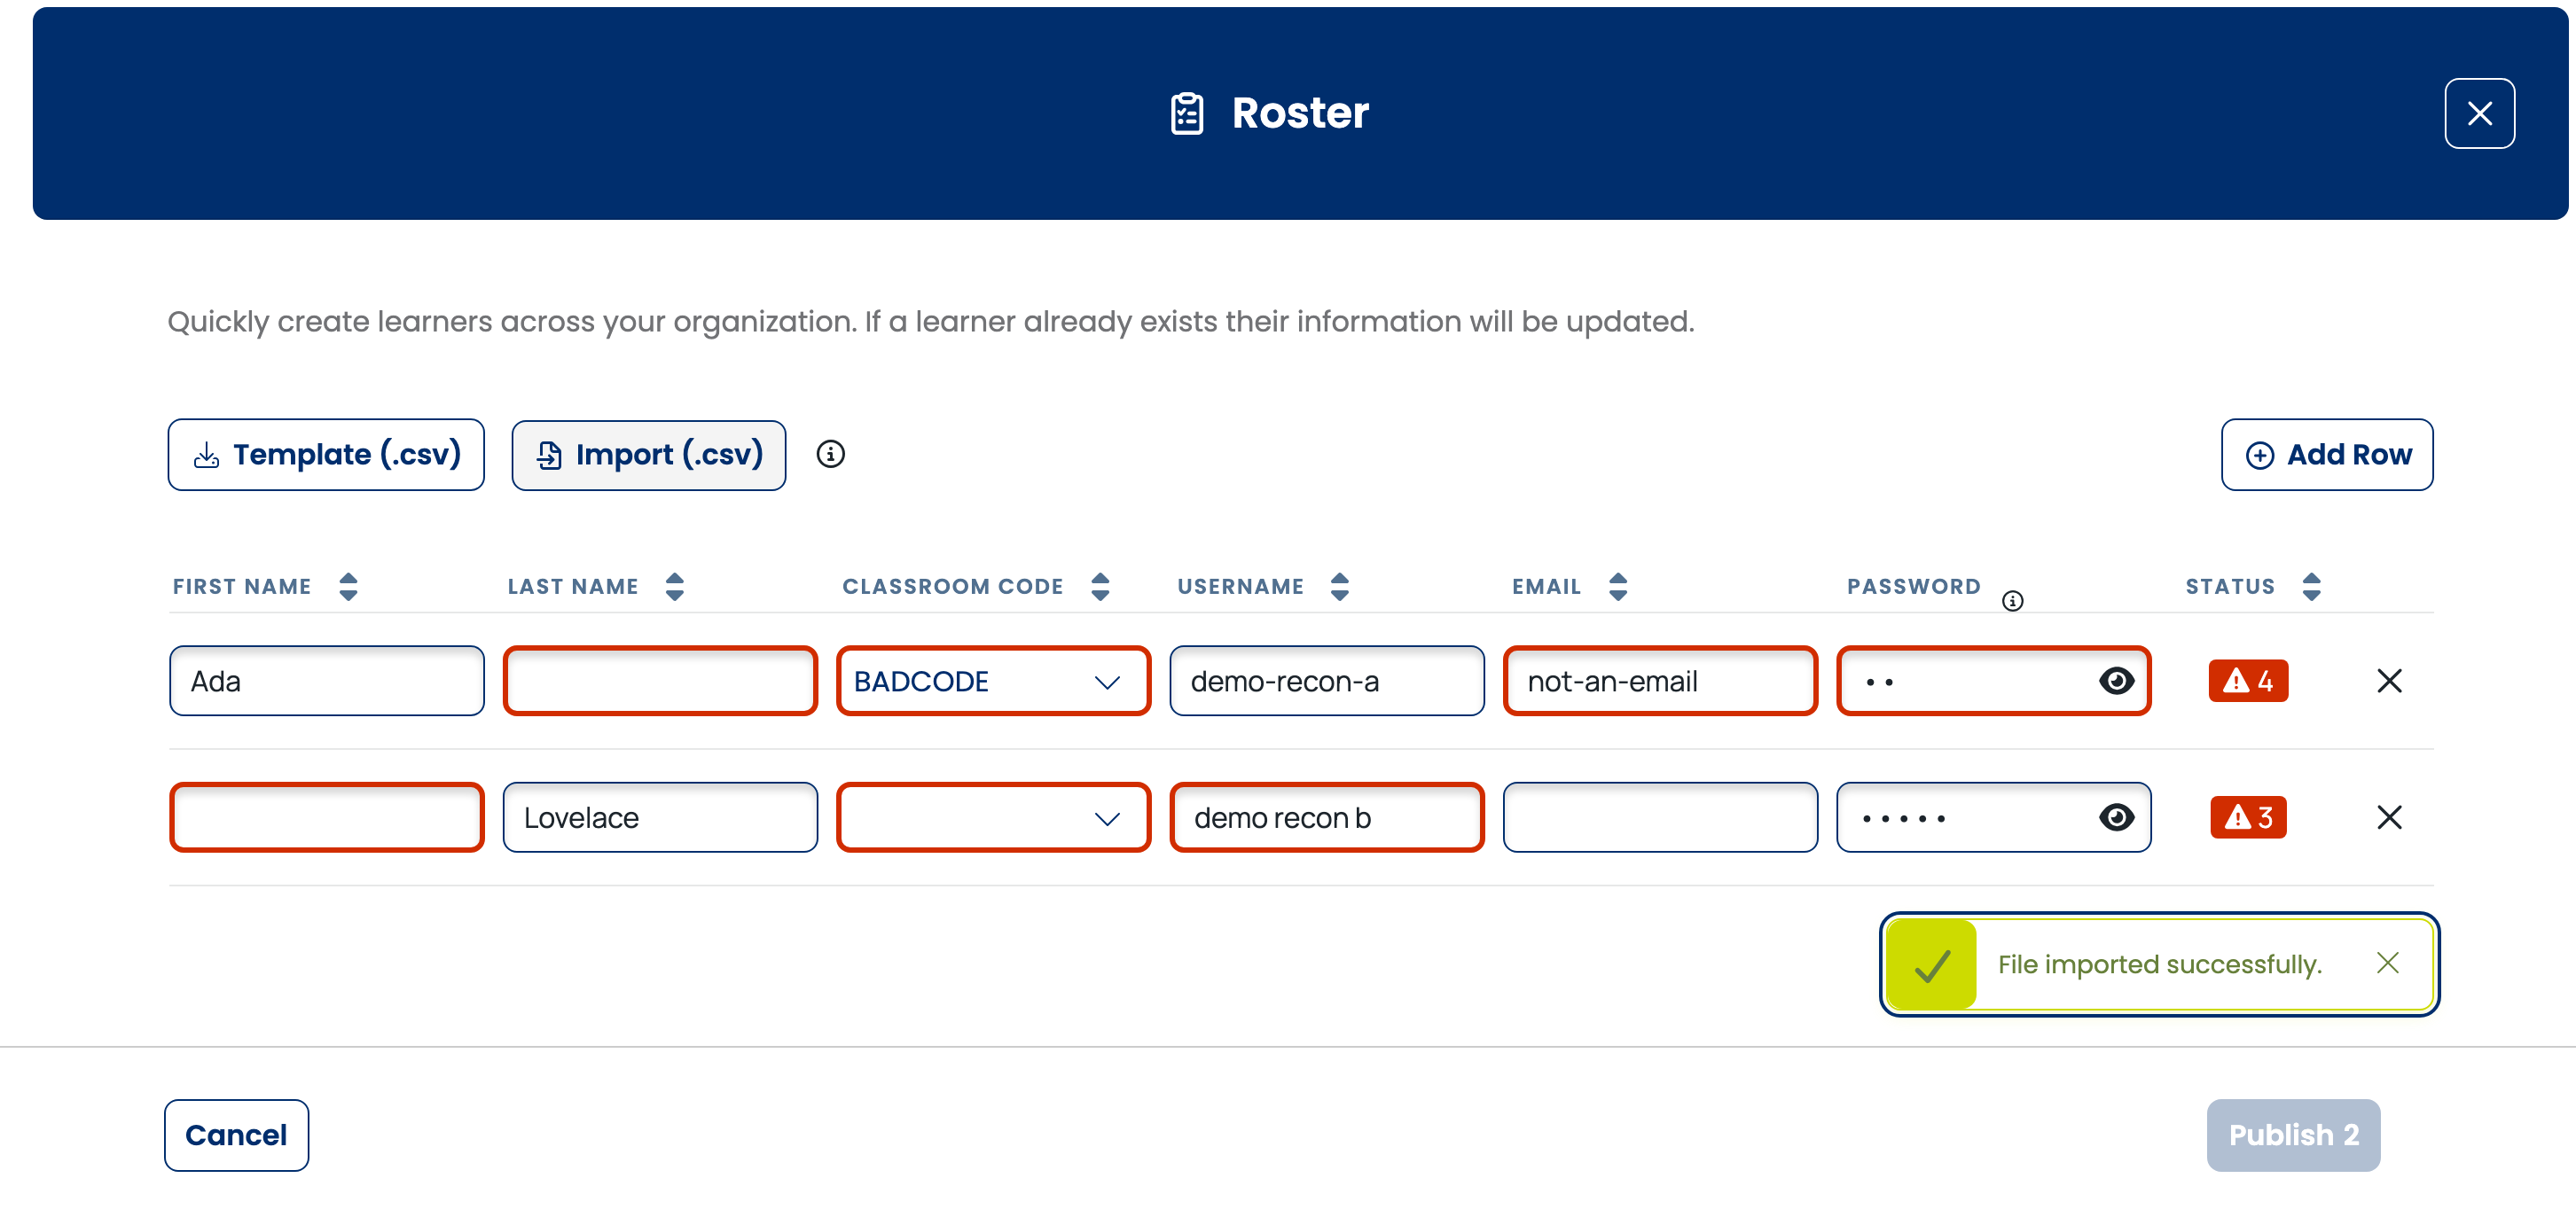
The grid marks problems three ways:
- Fields that need attention are outlined in red. Email is outlined differently, because it is optional.
- The Status column shows a red badge with the number of problems in that row.
- The publish button stays unavailable while any row still has a problem.
To see what is wrong with a particular field, point at it. The message appears next to it — for example, "Password is required."
Work through the flagged rows and fix them in place. The most common causes are:
- The username already exists. Usernames must be unique across the system, so choose a different one.
- The password breaks the rules. It needs at least 4 characters and at least one letter, with no spaces and no special characters beyond
!@.-_?or a comma. - No classroom is selected. A code that does not match one of your classrooms is not accepted — choose the classroom from the dropdown instead.
- A required field is blank. Everything except Email must be filled in.
To drop a row you do not want to create, select the control at the end of that row.
Success looks like no red outlines, a clear Status column, and the publish button available with the row count you expect.
When a large file has been processing in the background, Transfr emails you once it finishes. That email lets you download a CSV listing each error, so you can correct those rows and import them again.
Edit, archive, or delete a learner
Changes to one learner are made on the Users page with the Learners tab selected.
- Go to Users.
- Select the Learners tab.
- Find the learner's row.
- Select the three-dot icon at the end of the row.
- Choose Archive, Edit Details, or Change Password.
In Transfr, removing a learner means archiving them. Archiving does not delete anything: the learner's progress, sim history, and reports stay intact, and the learner stops appearing in active views.
To bring a learner back, filter the Learners tab to archived learners, select the learner, then unarchive them. They return in the state they were in when archived.
Permanent deletion is available only from the archived view, and it cannot be undone. For the full workflow, see How do I archive a classroom or learner?
Change passwords or archive several learners at once
On the Users page with the Learners tab selected, tick the checkbox at the start of each learner's row. A bar appears at the bottom of the table showing Select All, a count of how many users are selected, and the two actions you can apply to all of them: Change Password and Archive. Cancel clears the selection.
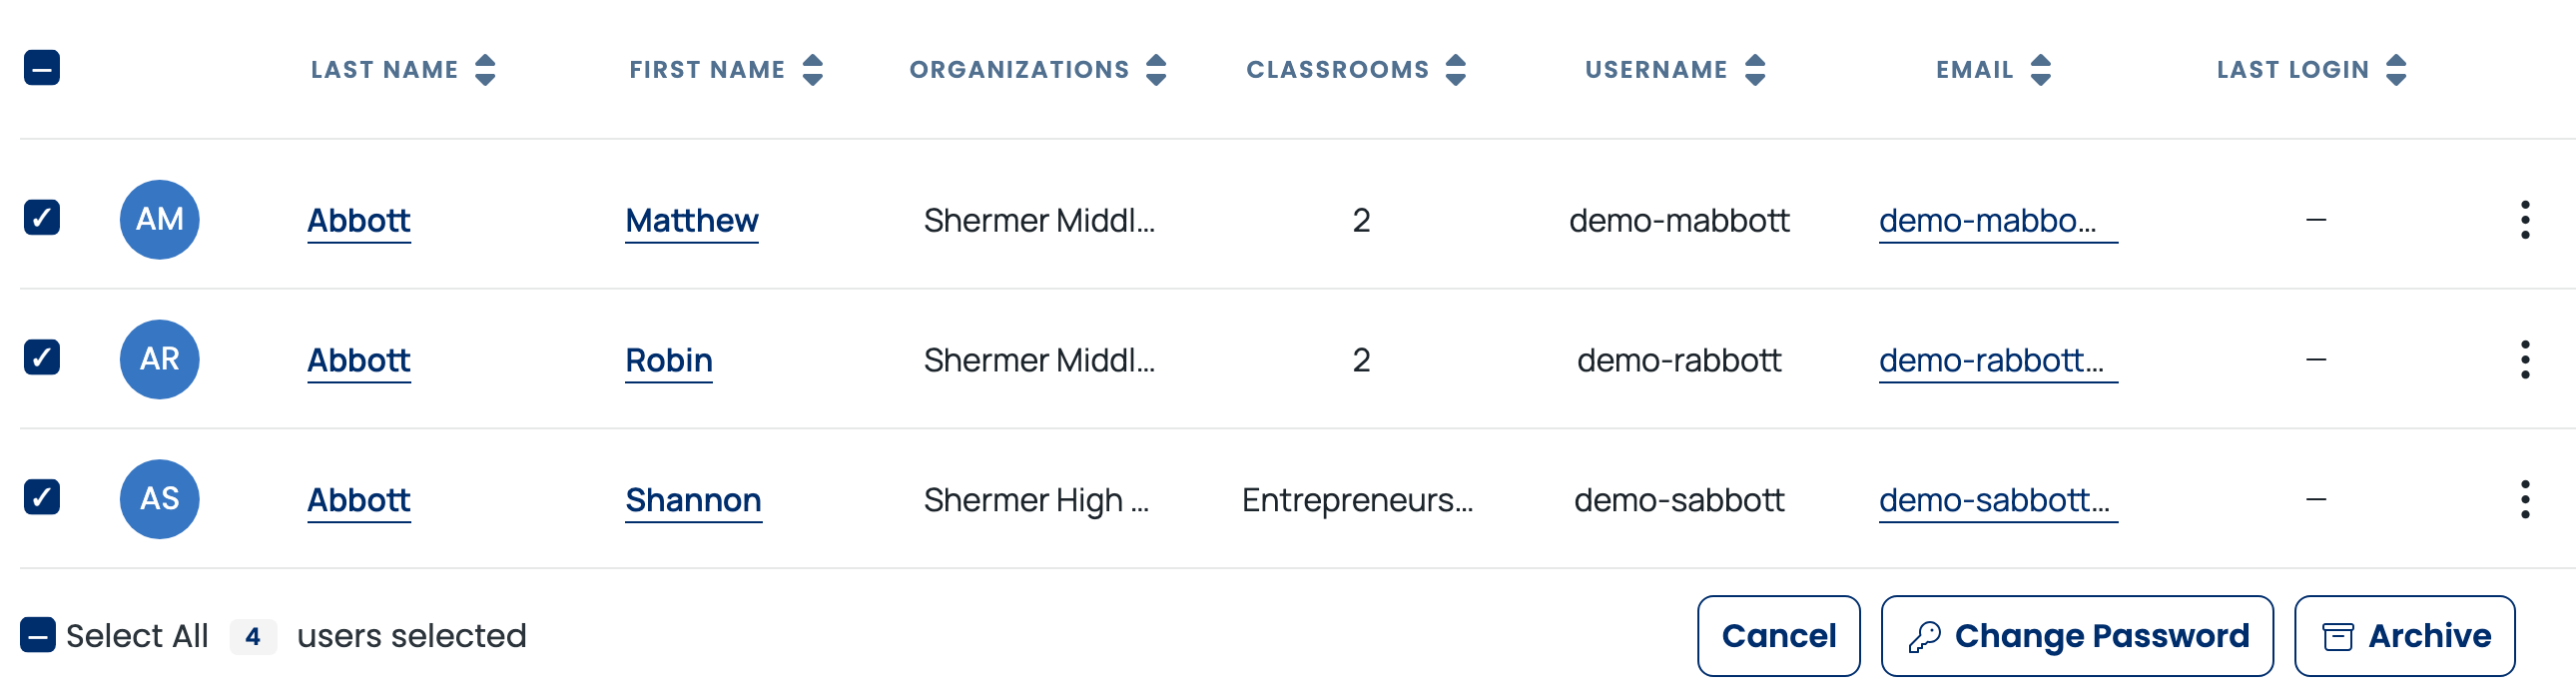
Those two are the bulk actions on this tab. To put a group of learners into a classroom in one pass, use Roster from this same tab instead: import a file listing those learners with the classroom code you want them in. Because an import updates learners who already exist rather than duplicating them, that is the shortest route to moving or assigning many learners at once.
If your district rosters through Clever, ClassLink, or NYC DOE
Learner accounts sync from your rostering system, so you do not add them through Roster or Add Learner. Make the change in your rostering system and it arrives on the next scheduled sync.
What to expect in the Dashboard:
- Learners dropped from a sync are archived, not deleted. Their records stay in place.
- Archived records keep receiving updates from the sync, including names, instructors, and enrollments.
- If your rostering system sends a learner again, they un-archive on their own and return to active.
- The archived view is read-only, because the sync owns archive state.
- Archived learners cannot sign in through SSO.
- Rostered organizations cannot archive or delete learners from the Dashboard.
For setup and sync behaviour, see How does rostering work with Clever and ClassLink?
Related articles
- Creating a Classroom
- How do I add, edit, or remove users?
- Trek Learner Dashboard Guide
- How do I archive a classroom or learner?
- Codes, logins, and PINs explained
Still need help?
Contact our support team — Monday–Friday, 8am–8pm ET, 646-466-2600, technicalsupport@transfrvr.com.
Last updated: July 30, 2026
