


Quest 2 Quick Start & Hardware Guides
Set up, use, and maintain your Quest 2: hardware guide, quick start, videos, and IT network requirements.
Note: These guides cover the Meta Quest 2. For Meta Quest 3S devices, see the Quest 3S Quick Start & Hardware Guides; the setup steps are nearly identical.
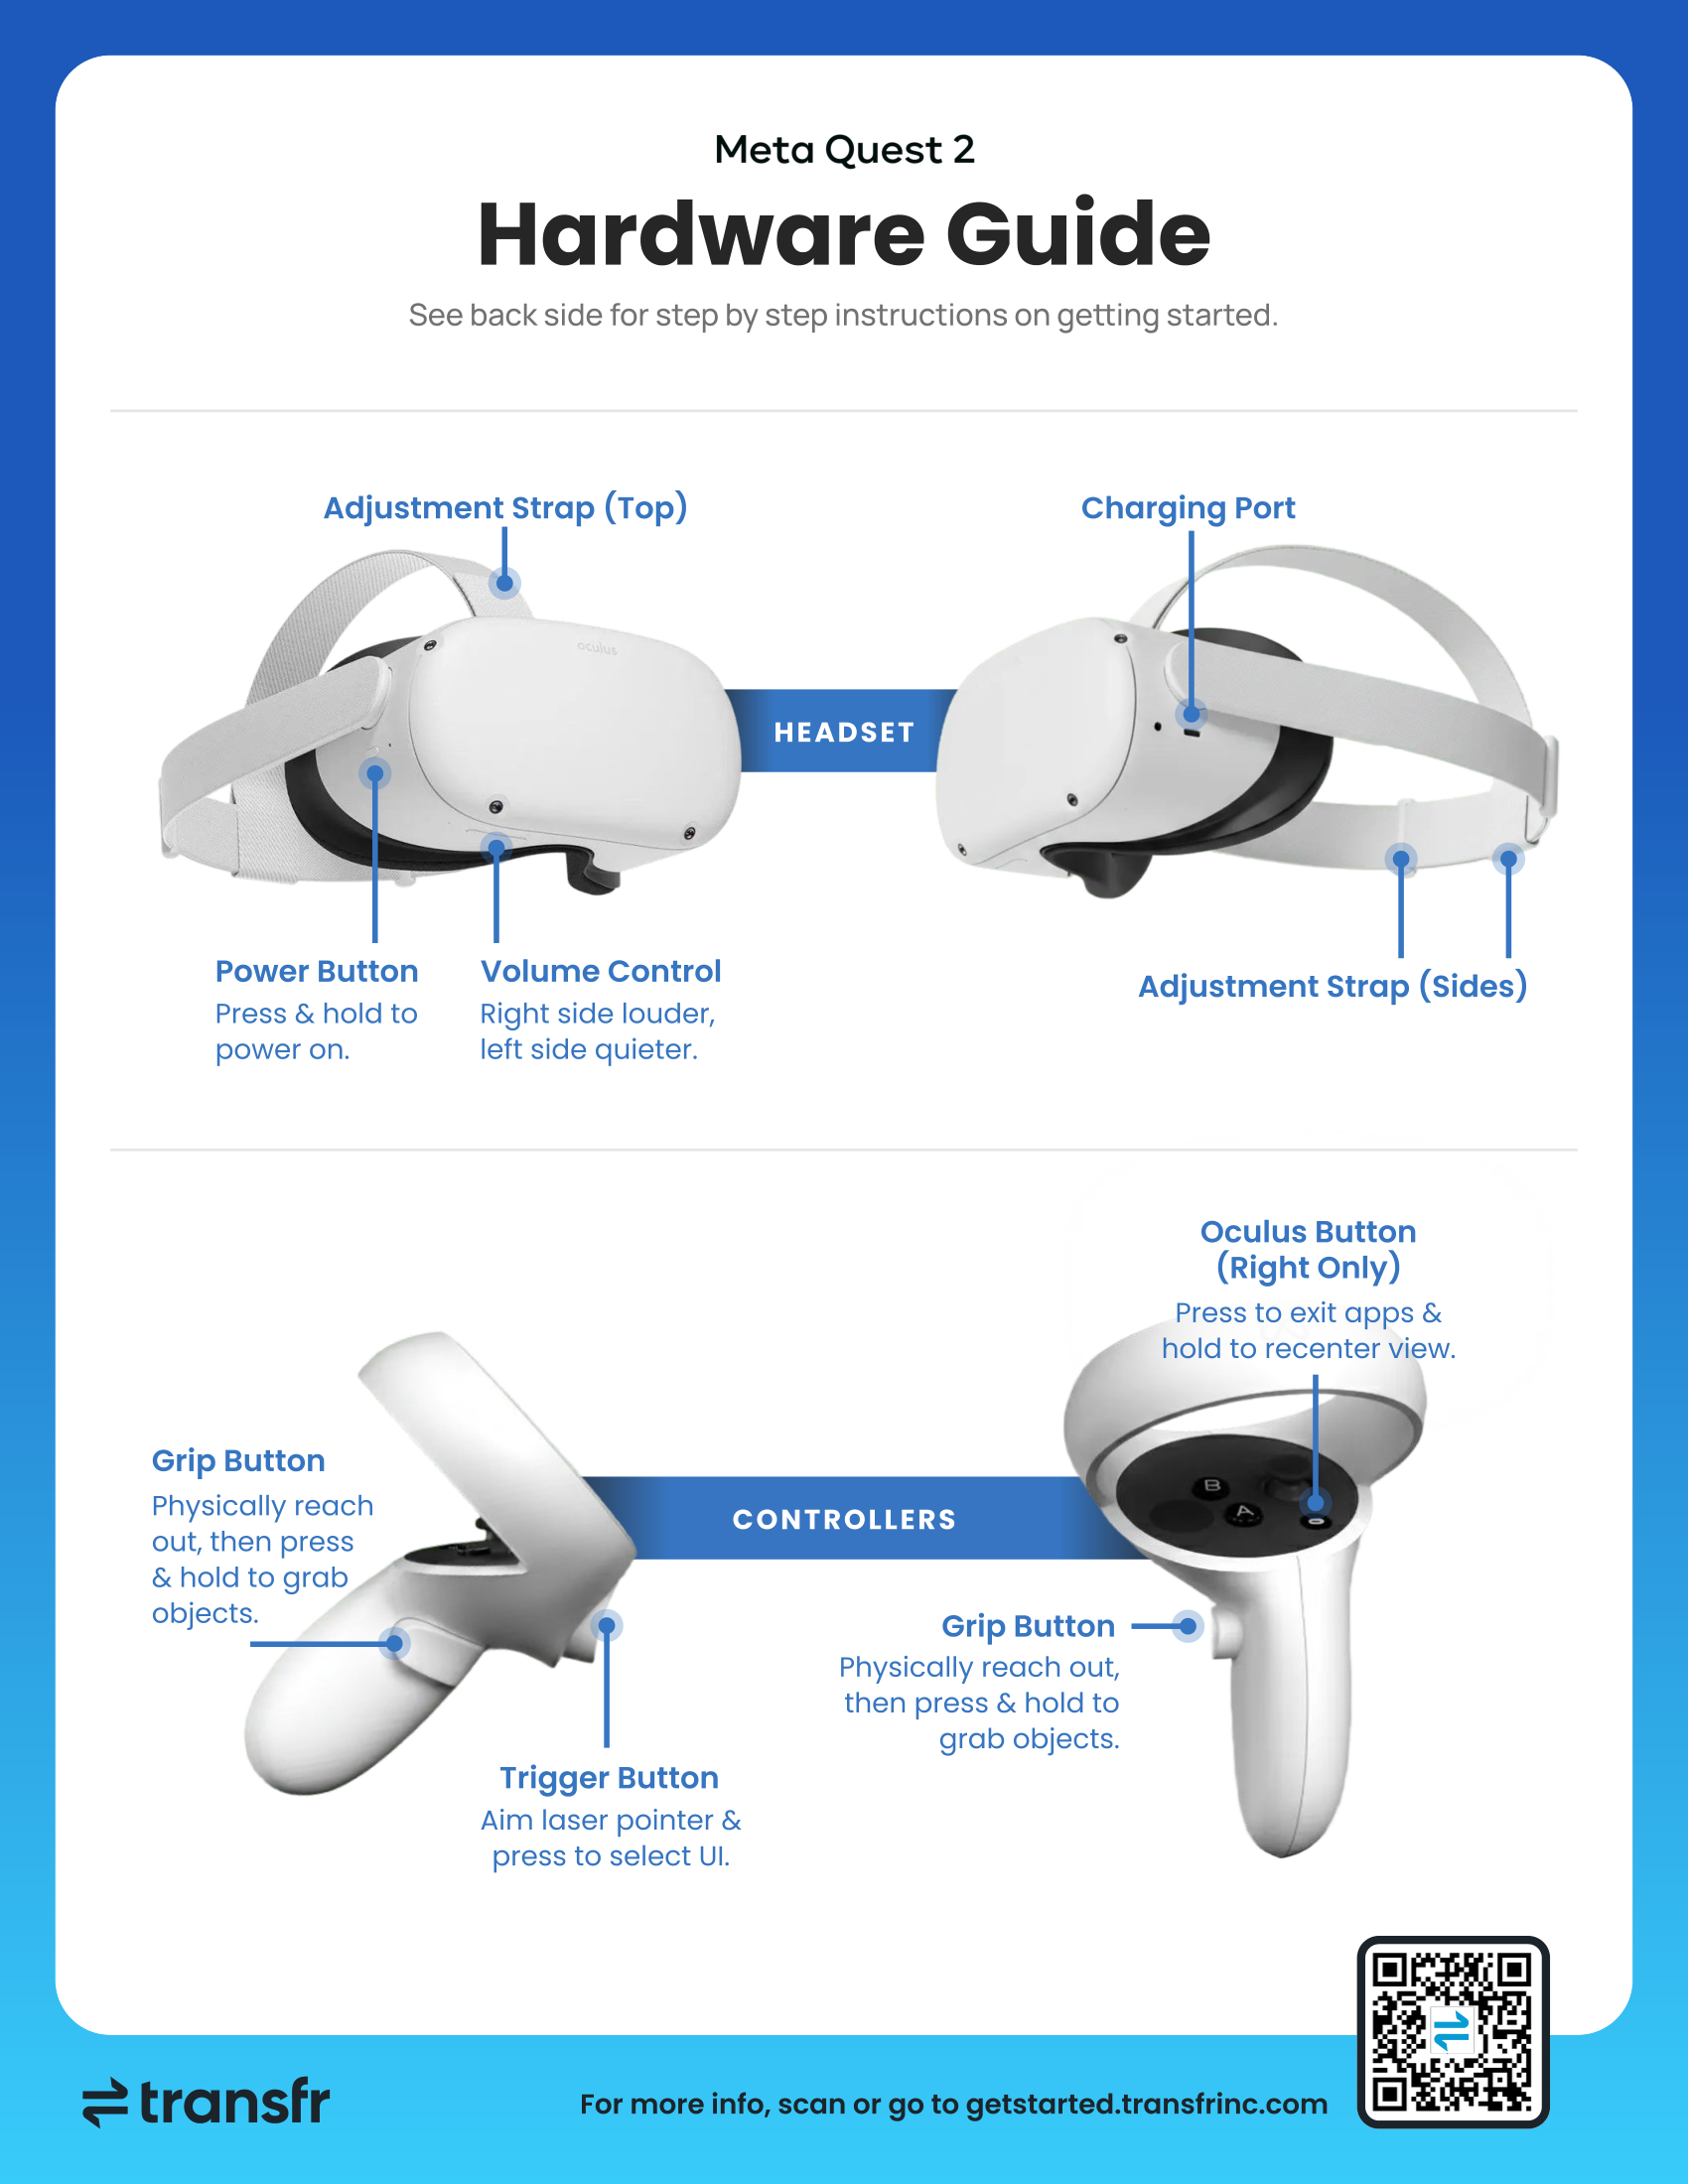
Hardware One Pager
Labels for the headset and controller buttons, ports, and straps.
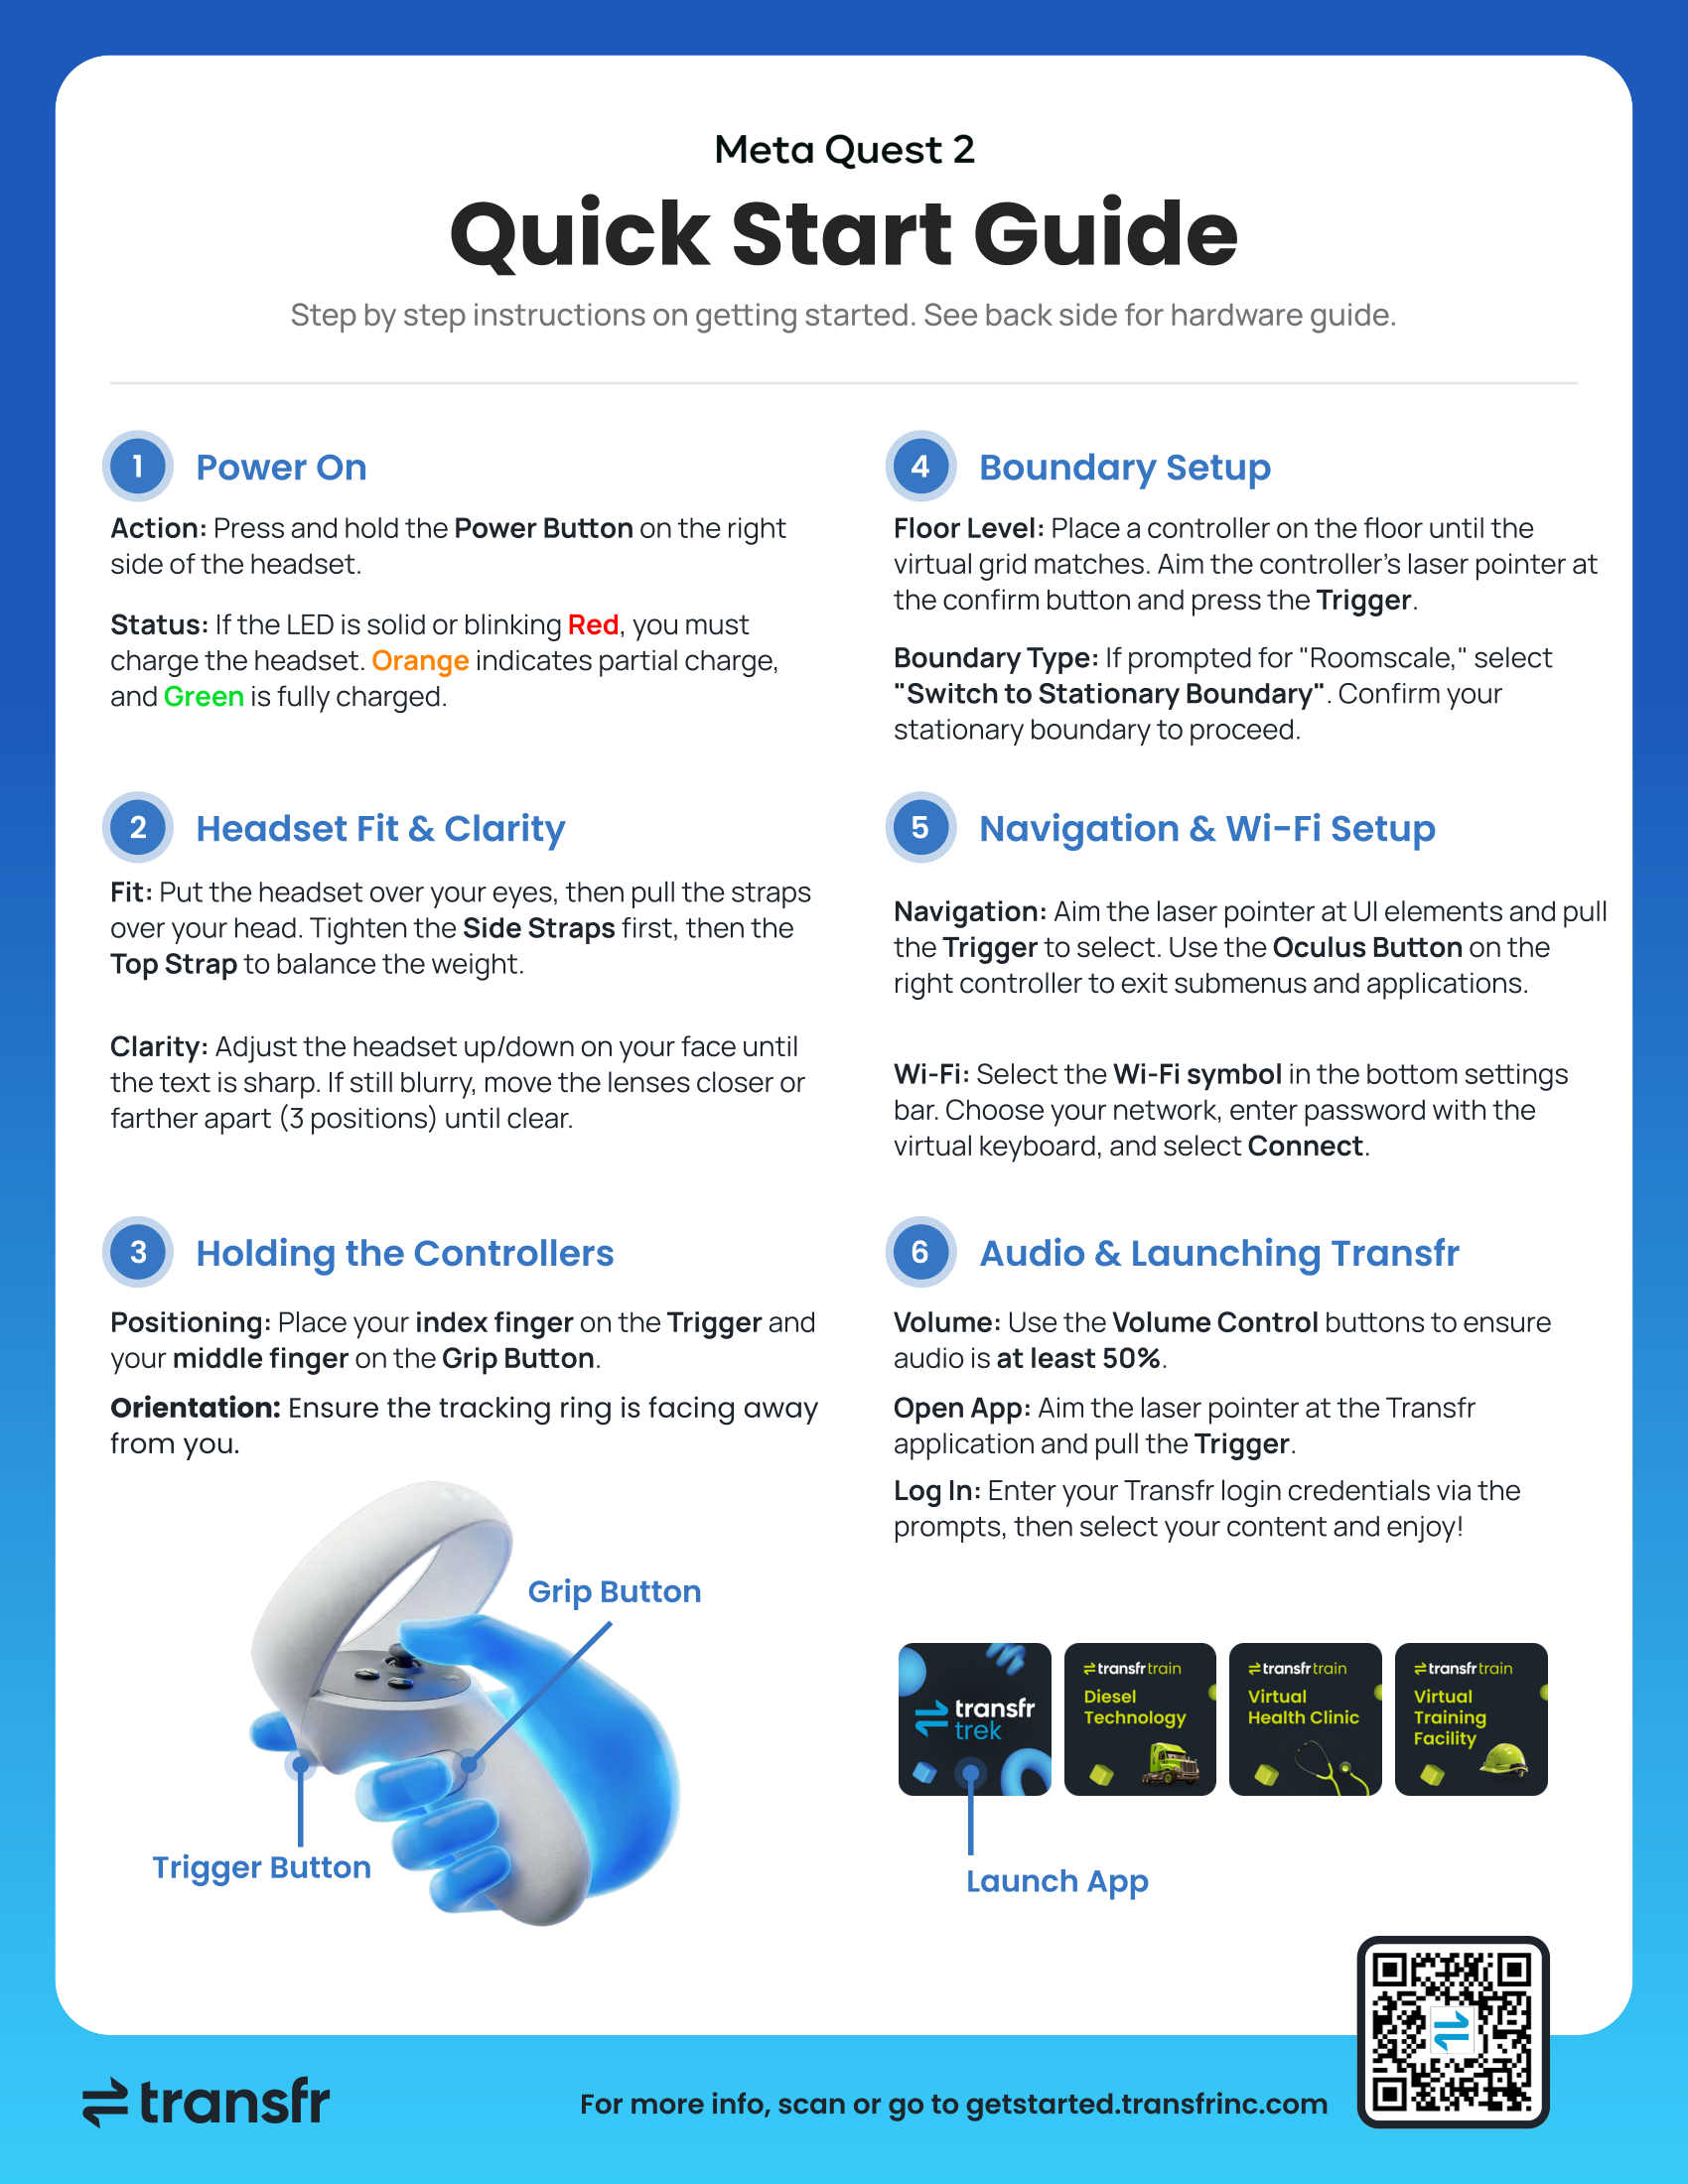
Quick Start One Pager
Step-by-step instructions for getting your Quest 2 up and running.
Detailed Guides
If you want more guidance on any of the getting started steps above, the following sections contain video walkthroughs and detailed breakdowns to help you get through all the specifics.
Unpacking Headset & Controllers, Power and Charging
Just opened your Transfr shipment? Start here. Each headset ships in a soft carrying case. Inside you'll find:
- The headset
- Two controllers (left and right)
- Two AA batteries — one for each controller
- A charging cable and power adapter
- A microfiber cloth for cleaning the lenses
Keep the case for storing and transporting the headset between sessions.
To power on the headset:
- Press and hold the power button on the right side until the screen lights up.
- Check the status LED: green is fully charged, orange is partial, and red (solid or blinking) means it needs charging before use.
To charge the headset:
- Plug the charging cable into the charging port and the adapter into a wall outlet.
- Leave it until the LED turns green.
Adjusting Headset Fit & Lenses
To adjust the fit:
- Put the headset over your eyes and pull the straps over the back of your head.
- Tighten the side straps first so the headset sits level.
- Tighten the top strap until the weight feels balanced and the headset stays in place.
To sharpen the image:
- Slide the headset up and down on your face until the text looks sharp.
- If it's still blurry, adjust the lens spacing — the Quest 2 has three settings (58, 63, and 68 mm) — until the image is clear.
Introduction to the Controllers
To get the controllers ready:
- Insert one AA battery into each controller.
- Attach a wrist strap to each controller and slip it over your wrist so it can't slip out of your hand.
Hold a controller with the tracking ring facing away from you. You'll use these buttons most:
- Trigger — under your index finger. Aim the laser pointer and press to select.
- Grip button — on the side, under your middle finger. Press and hold to grab objects.
- Meta / Oculus button (right controller only) — press to exit an app, hold to recenter your view.
Using the Controllers
To point and select:
- Point a controller at the screen — a laser pointer shows where you're aiming.
- Aim at a button or menu item and press the trigger button to select it.
- To go back or exit, press the Meta / Oculus button on the right controller.
To grab an object in a simulation, reach toward it and hold the grip button. Release the grip button to let go.
To type with the virtual keyboard:
- Select a text field, such as the login box, to open the on-screen keyboard.
- Aim at each key and press the trigger button to type.
- Select Submit to confirm.
VR Boundary Setup
The boundary marks the safe space you can move in while wearing the headset. Set it up every time you use VR in a new spot.
To set up your boundary:
- Clear the area of furniture, cords, and anything you could bump into. If you step outside the boundary during use, the headset shows your real surroundings through its cameras.
- Choose a boundary type when prompted: Roomscale (recommended, so learners can move around) or Stationary (the smallest boundary, centered where you stand). Roomscale needs at least 4 to 6 ft diameter floor space per learner.
- Confirm the floor level. If it looks off, select redo and lower a controller to the floor until the virtual grid lines up with the real floor.
- Draw the boundary (Roomscale only): aim at the ground, hold the trigger, and trace the edge of your space until you return to where you started. Stationary has nothing to draw — just look down to check it's centered.
VR Wi-Fi Setup
The headset needs Wi-Fi to log in, load simulations, and upload session data.
- Find the settings bar at the bottom of your view and select the Wi-Fi symbol.
- Select your network from the list.
- Enter the password with the virtual keyboard — aim at each key and press the trigger button.
- Select Connect. You're connected when the Wi-Fi icon fills in.
On a district network, your IT team may need to allow Transfr's endpoints — see Network Requirements below.
Adjusting the Volume
Learners need to hear the in-headset coach clearly.
- Find the volume buttons on the underside of the headset — the right side raises the volume, the left side lowers it.
- Set the volume to at least 50% so learners can hear the coach and simulation audio clearly.
Network Requirements
The full list of ports, URLs, and protocols lives in one place so it stays current: What ports and URLs does Transfr need allowlisted?. That page prints as a clean handout for a network team — Ctrl+P, or the print link at the top of it.
Notes
- Only use the included cable and adapter, or a compatible replacement, to charge the headset.
- Clean the headset between users — see Cleaning Guidelines and Procedures.
- If the headset won't power on even after charging, or the Transfr app is missing from the library, contact our support team via the link below.
- If there's no sound, check that the volume isn't muted and that the simulation has started.
Still need help?
Last updated: August 3, 2026
